
Clay Creations
- Laura

- Aug 21, 2020
- 5 min read
A couple years ago in one of my art classes, I experimented some with clay. I had an idea for a lion candle-holder and started out with a wire frame. Around this wire frame, I wrapped some foil to give it's shape, leaving holes around the lion's eyes. Having the wire and foil in the center also helps the clay to not have to be as thick. This saves some clay and the time it takes to cook.

Once I had the frame, I covered it in the clay and added on the snout, mane, and ears. When the main sections were there, I shaped the cheeks, the area around the eyes, and the nose and mouth, and I used scissors to create the hair of the mane. With a toothpick, I added the texture.

Pleased with how it looked, I went ahead and baked it in the oven, since it wasn't the kind of clay that required a kiln. After it baked and had cooled down, I painted it, mainly using tans, browns, oranges, black, and little white. Once the paint dried, I was able to put a candle in it and try it out! The candlelight can be seen through the holes in the eyes when it's dark. This was a really fun project to make, and I loved the look of the final product.


Then this February, I got the chance to join an actual ceramics class with a couple of friends. After only a couple weeks, though, we had to take a break because of the restrictions for Covid-19. Finally in June we were able to attend again, and I finished the flower pot I had started four months before.
I wanted to make a small, round pot. I started by rolling out the clay to an even thickness and cutting out a circle. Next I rolled out long strips of clay that would wrap around the edge of the circle. I placed one strip around the bottom, another strip on top of that one, and so on until the pot was as tall as I wanted it. To make sure they stuck together, I cut little lines around the edge of the circle, then smeared some watered-down clay around the lines. The next strip would go on top of this wet clay and would attach better.
Once I had all the clay stuck together and in the general shape I wanted, I began smoothing all the strips together. I put another strip on the inner side of the pot to help seal the edge between the circle and the first strip, and I smoothed these together as well. As I smoothed the outside of the pot, with both with a wooden tool and with my hand, I kept my other hand on the inside of the pot. By doing this, I was able to slightly bend it to the curved shape I wanted. In the same way, when smoothing out the inside, I kept my hand rounded on the outside to keep the curved shape. When the sides were smoothed, I scraped clay off in some spots and added clay in other spots along the rim to make sure it was even. Using the wooden tool again, I smoothed off the top rim of the pot. To make the saucer for the flower pot, I followed a similar process. I started with a larger circle and added strips, this time using fewer so that the edges were shorter.
Since I wanted the pot and saucer to be white so I could paint better on them, I painted a more liquid-y, white clay over both objects. Then, after our ceramics teacher baked the pot and saucer in her kiln, I could start painting it. I found a pattern that I liked: purple squares with blue flowers and dots of yellow. I began by lightly drawing it in pencil at first, as it was hard to make a square pattern around a circular object. then I painted in the purple squares, which I then filled in with the blue flowers. The yellow dots went at the center of the flowers and at the corners of the squares. I painted the top rim and the bottom of the pot with blue, and I also painted the edge of the saucer blue. Once it was painted, it went in the kiln again with a glaze and came out shiny and ready for a plant!

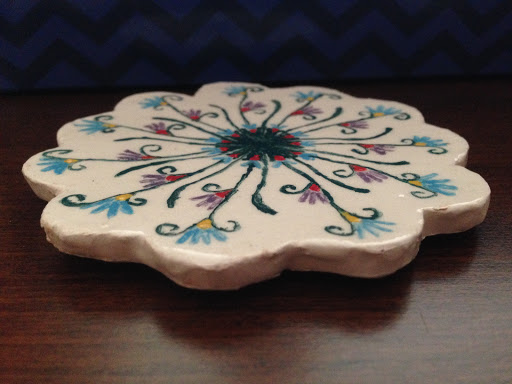
After the pot, I wanted to try something with a simpler shape and a more complex design painted on it. I decided on some coasters, so I began again with rolled out clay that I then cut four circles from. I cut out rounded humps around the edge of the circles, as if to make a flower shape. I covered these in the white clay as well, and then they were baked. I came up with a design for the coasters and just drew it out in pen on paper to have a reference. The design was a blue-green center with stems coming out and curling around into each little hump. There were blue flowers at the inner and outer edges, with purple flowers in the middle. Red dots were the contrasting colors for the inner two rows of flowers, and yellow dots for the outer row.

Once they were glazed and baked again, I stuck a foam type material on the bottom so they wouldn't scratch a table or get scratched. After the glaze and second baking, they also looked much more vibrant!


Next I made a pencil holder. For this shape, basically a cylinder, I cut out the circle for the bottom. After measuring the circumference of the circle, I rolled out a rectangle of that width and of the height that I wanted. Using the "cut little lines and smear wet clay on it" technique, I wrapped the rectangle around the circle. I rolled out a strip to seal the inside where the rectangle and circle met, and then I smoothed everything out. After the white clay and the baking, I painted this one with a design of hexagons. Each hexagon I divided into six triangles, painting them in the colors of a color wheel.

As we were finishing up one of the classes, I was playing with my leftover clay bits and ended up making two tiny cactus pots and a little hamburger. Our teacher said she could bake those too, so I ended up painting them as well.


Finally, these last two weeks, I've been working on a hot chocolate mug. Yes, a mug specifically for hot chocolate. And yes, I'm making it in August. I'm excited. I started it out with a sketch. The mug would be made of "chocolate squares" and the candy cane handle would be attached with marshmallows. I followed the same general process as the flower pot: the circle, strips built up on it, and smoothing it out. I cut squares into the mug for the chocolate, and then I rolled out another strip and bent it into a candy cane shape. I shaped little, pudgy marshmallows and stuck them on the mug with the "cut little lines and smear wet clay" method, and then attached the candy cane's two tips to the two marshmallows. Since I used a different type of clay for this mug, I didn't need to cover it in the white clay before baking. Before I was able to paint it, I had a good bit of sandpapering to do to make sure it was smooth and finished looking. Then I painted the squares brown, the marshmallows white, and the candy cane an alternating red and white. Once I get the mug back after being glazed and baked, I'll post it on the gallery, so make sure to watch for that!

I've really enjoyed learning what I have so far, and I'm excited to see what I'll learn and create in the next couple weeks!


Comments